Office 365 Tenant-to-Tenant Migration: The Ultimate Step-by-Step Guide
Overview: The Office 365 tenant-to-tenant migration is the process of moving your Office 365 content between two tenant accounts. This migration is often required during mergers, acquisitions, or rebranding of the companies. But Microsoft doesn’t provide a direct solution to migrate one tenant account to another. Therefore, it is important to use the right tools and do proper planning before the migration. Therefore, we will discuss some of the effective methods for conversion, including the Email Backup Wizard for quick migration.
Major Reasons to Migrate Office 365 from tenant to tenant
There are various reasons behind the Office 365 Tenant-to-Tenant Migration. You can explore some of the most common ones from the list below.
- Organizations generally merge data during company mergers or acquisitions.
- This migration is performed to move an individual business unit to a new tenant.
- A company migrates when it has to adopt a new domain during rebranding.
- After migration, users can consolidate multiple tenants in one place.
- Also, the migration is performed to make sure that the organization follows the right compliance rules or not.
Proven Methods to Office 365 Tenant-to-Tenant Migration
Here, in this section of the article, let me introduce you to the two most effective methods of migration.
- Automated Software
- Manual Method
Method 1: Best Software for Microsoft 365 Tenant to Tenant Migration
It might feel overwhelming to migrate data between two tenant accounts of Office 365, especially for beginners who use manual methods. To make this task simpler, the Email Backup Wizard was introduced. This software helps users to transfer a large amount of Office 365 data from the source tenant to the target tenant without any data loss. Moreover, you can reduce the chances of human errors by cross-verifying your selected files. Furthermore, it preserves the attachments, folder structure, and metadata throughout the migration process. Additionally, you can customize the Office 365 files and folders you selected by utilizing the integrated features, such as remove duplicate mails & date range filtering. Using the same software, users migrate Office 365 to Google Workspace, Thunderbird, AOL, and Yahoo Mail. This way, you can customize the conversion process according to your needs.
Simplified Tutorial to Perform Office 365 Tenant-to-Tenant Migration
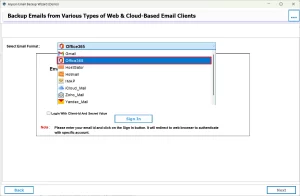
- Open the Email Backup Wizard >> choose Office 365 as the source.
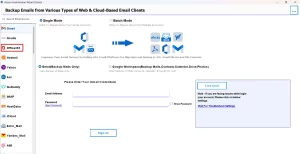
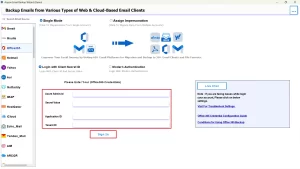
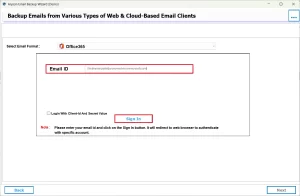
- Then, enter your admin credentials to log in to the Office 365 tenant account >> Next.
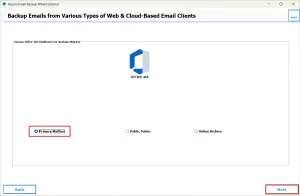
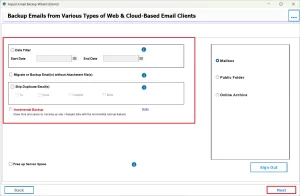
- After that, select the desired Office 365 mailboxes you want to migrate >> Next.
- Now, choose Office 365 from the Migrate in Email Client dropdown list.
- Next, enter the credentials associated with the target tenant ID and log in.
- At this point, you can utilize the built-in filters of the software >> Next.
Additional Note: This approach can perform tenant-to-tenant migration within a few clicks. However, if you have technical knowledge and sufficient time to invest, you can proceed with the manual migration. But remember, it is important to follow the steps below carefully to avoid any kind of errors during configurations.
Method 2: Manual Office 365 Tenant-to-Tenant Migration
The Manual migration between two Office 365 tenants requires two stages to complete.
-
-
- Pre-Migration Stage
- The Office 365 to Office 365 Migration
-
Stage 1: Pre-migration Stage
Step 1: Preparation of the Domain
- Firstly, make sure that your target Office 365 tenant has all the required licenses.
- Next, establish admin accounts in both the source and destination tenant accounts.
- Make sure that global admin access is granted in both the source and target tenant.
- Next, configure user mailboxes, resource mailboxes, and export distribution groups in the destination.
- You can consolidate Active Directory domains and subsequently synchronize them with the target tenant.
- Convey to and train the users about potential downtimes and password modifications that could happen following the migration.
Step 2: Cross-check the Domain
- Next, start the domain verification for the destination tenant in Microsoft 365.
- Generate the necessary TXT DNS entries and incorporate the source domain into the target tenant’s configuration.
- DNS changes may take 15 minutes to 24 hours, depending on TTL values.
- Do not change MX records at this stage to avoid mail disruption.
Step 3: Plan the Migration
- Next, provide all the mailboxes that you need to move & create a mapping CSV file.
- Remember: Use a CSV file only if PowerShell or third-party tools are used.
- Now, note down the lowest value of TTL associated with your domain’s MX record to plan downtime.
- Reduce MX record TTL to 24–48 hours before migration.
- Then, you have to Disable directory synchronization to prevent new changes.
- Disable Azure AD Connect only if the on-prem Active Directory is configured.
Stage 2: O365 Tenant-to-Tenant Migration
Step 1: Control the Incoming Mail
- Next, you have to pause incoming emails to the source tenant.
- For that, modify the MX record or use a third-party software(optional).
Step 2: Prepare the Source Tenant
- Now, modify all previous email addresses to the default Office 365 domain.
- Then, you have to remove Lync/Skype licenses from the source tenant.
- Remove Teams licenses only if required for domain removal.
- Subsequently, you are required to reset distribution lists and resources to their respective domains.
- See all secondary emails that are linked to the migrating domain >> remove them.
- Next, simply use PowerShell to identify if any object is using the source domain.
- Confirm via PowerShell that no objects are still linked to the source domain.
Step 3: Prepare the Target Tenant
- Next, log in to the autodiscover CNAME record.
- In case the AD FS is used, log in to the new domain for authentication.
- Subsequently, you must activate the new user accounts and supply the necessary licenses.
- Assign licenses after mailbox creation to avoid provisioning issues.
- After that, specify the source domain as primary email >> share new credentials.
- Now, update the MX record to the target tenant >> redirect mail flow.
- At last, send emails to verify that it is being sent & received properly.
Conclusion
In the above blog, we discussed two different methods for Office 365 Tenant-to-Tenant Migration. The first method was the automated software, which helps the user to carry out the entire migration within a few clicks. Whereas, in the manual approach user has to perform configurations of different accounts & must acquire the technical expertise. You can proceed with either of the two methods as per your requirement.
Frequently Asked Questions
Ans- Companies perform Office 365 Tenant-to-Tenant Migration to merge or reorganize data during mergers, acquisitions, rebranding, or to consolidate multiple tenants for easier management.
Ans- If you are using the automated solution, it will take you seconds to perform a Microsoft Tenant-to-Tenant Migration Services.
Ans- Using the automated software, you can migrate all Office 365 services between tenants.
Ans- Yes, if using the above software, Office 365 Tenant-to-Tenant Migration is secure.
Ans- Yes, you can migrate multiple tenants into a single Office 365 tenant, using the above software.
About The Author
Khushboo Maurya is a content and website optimization expert who helps blogs and websites grow naturally. She focuses on improving content quality and reaching more people through smart, simple strategies.